Drawing projections
There are a number of techniques of projection that can be used to represent three-dimensional objects in two-dimensions by 'projecting' their image onto a planar surface.
Drawing projections should comply with relevant standards (such as British Standards) to prevent misunderstanding and avoid errors in interpreting the drawing.
See also projections detailing, projections measurement and projections dataset.
Contents |
[edit] Orthographic projection
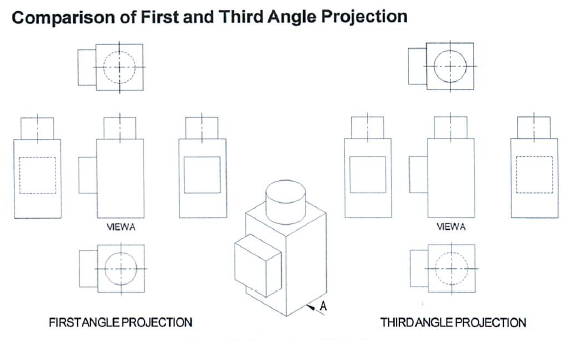
Orthographic projection is a type of 'parallel' projection in which the four orthogonal views of an object are shown. The orthographic projection commonly used in the UK is called first angle projection.
[edit] Axonometric projection
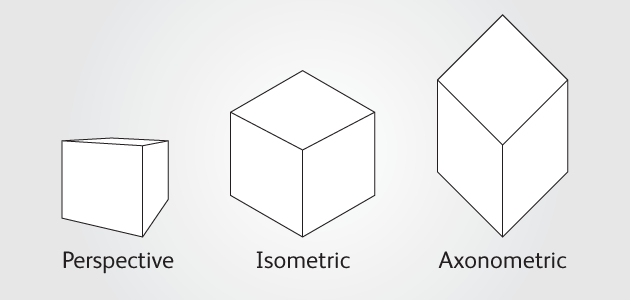
Axonometric projection creates a true plan set at 45º, which retains the original orthogonal geometry of the plan. It is particularly suitable for representing interior designs, such as kitchen layouts. Planning drawings can also be effective represented as axonometric projections, showing the relationships between buildings and topography.
The axonometric method became increasingly popular in the 20th century as a formal presentation technique, but recently has become less widely used due to the emergence of CAD programmes and building information modelling.
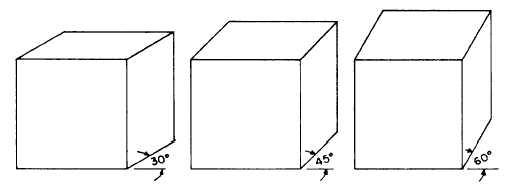
NB Drawing for Understanding, Creating Interpretive Drawings of Historic Buildings, published by Historic England in 2016 suggests that axonometric projection: 'Is a type of parallel projection used for creating a drawing where the plan is drawn to scale but rotated at an angle of 60° or 30°along one or more of its axes relative to the normal axis.'
[edit] Isometric projection
The isometric was the standard view until the mid-20th century. Unlike the axonometric projection, the isometric plan view is slightly distorted, using a plan grid at 30º from the horizontal in both directions. It can be used to show the nature of the design and explain construction details more clearly than an orthographic projection. It is sometimes used during concept design to help the client grasp the mass of the proposal.
[edit] Oblique projection
When primary information is drawn in elevation, the interpretation can be enhanced by an oblique projection. This is a simple method of producing two-dimensional images of three-dimensional objects. The differentiating characteristic of oblique projection is that the drawn objects are not in perspective, and so do not correspond to any actual obtainable view.
[edit] Parallel projection
'Parallel projections have lines of projection that are parallel both in reality and in the projection plane.' Ref Drawing for Understanding, Creating Interpretive Drawings of Historic Buildings, published by Historic England in 2016.
[edit] Related articles on Designing Buildings
- Architectural reprography.
- As-built drawings and record drawings.
- Assembly drawing.
- Augmented reality in construction.
- Bill of quantities.
- Blueprint.
- Building information modelling.
- CAD layer.
- Component drawing.
- Computer aided design.
- Concept drawing.
- ConTech.
- Detail drawing.
- Elevations.
- Engineering drawing.
- Exploded view.
- General arrangement drawing.
- Geometric form.
- How to draw a floor plan.
- Installation drawings.
- Manual drafting techniques.
- North American Paper Sizes
- Notation and symbols.
- Orthogonal plan.
- Paper sizes (ISO 216 A, B and C series)
- Production information.
- Section drawing.
- Shop drawings.
- Site plan.
- Specification.
- Technical drawing.
- Types of drawings.
- Working drawing.
Featured articles and news
ECA, JIB and JTL back Fabian Society call to invest in skills for a stronger built environment workforce.
Women's Contributions to the Built Environment.
Calls for the delayed Circular Economy Strategy
Over 50 leading businesses, trade associations and professional bodies, including CIAT, and UKGBC sign open letter.
The future workforce: culture change and skill
Under the spotlight at UK Construction Week London.
A landmark moment for postmodern heritage.
A safe energy transition – ECA launches a new Charter
Practical policy actions to speed up low carbon adoption while maintaining installation safety and competency.
Frank Duffy: Researcher and Practitioner
Reflections on achievements and relevance to the wider research and practice communities.
The 2026 Compliance Landscape: Fire doors
Why 'Business as Usual' is a Liability.
Cutting construction carbon footprint by caring for soil
Is construction neglecting one of the planet’s most powerful carbon stores and one of our greatest natural climate allies.
ARCHITECTURE: How's it progressing?
Archiblogger posing questions of a historical and contextual nature.
The roofscape of Hampstead Garden Suburb
Residents, architects and roofers need to understand detailing.
Homes, landlords. tenants and the new housing standards
What will it all mean?
The Architectural Technology podcast: Where it's AT
Catch-up on the latest episodes.
Edmundson Apprentice of the Year award 2026
Entries now open for this Electrical Contractors' Association award.
Traditional blue-grey slate from one of the oldest and largest UK slate quarries down in Cornwall.
There are plenty of sources with the potential to be redeveloped.
Change of use legislation breaths new life into buildings
A run down on Class MA of the General Permitted Development Order.
Solar generation in the historic environment
Success requires understanding each site in detail.


