


Main author
Roundhouse ArchitectureConical roof slating
As with any traditional skill, taking care and time to prepare properly is essential when slating a conical-shaped roof.
Contents |
[edit] Roof geometry calculation.
It is important to consider the geometry of the surface to be slated, which will be both sloping and curved. Natural slates are flat and sizes will vary, this means consideration has to be given to how they will sit on the curved plane.
In this article, the roof used as an example has a diameter at eaves/gutter level of 8500mm and a roof pitch of 40 degrees. The dimension from eaves to apex on the sloping line of the roof can be calculated by simple geometry. This dimension is important in the setting out and template making procedure. The circumference of the roof must also be calculated (making allowance for any overhang into the gutter at eaves level).
Below are a series of images of the building to be slated at various stages of construction followed by a step by step approach describing how the slating was carried out.

"The Roundhouse" which will form a new architectural studio.

Note the Robin perched on the roof apex stud - this stud is used to attach a thin gauge wire for marking out slate courses and position.

First courses of slating on the main roof - note the undereaves slates fitted upside down to form a drip with the first course slates. The width of the first course slates was 12", a very heavy, thick slate to cut. The building will have an exposed timber eaves. The gutter will be formed in cast aluminium.

Straight section of small roof, merging into curve.

Small roof curve with slates sitting with a seamless bond with the straight roof section.

Higher up the main roof with purpose-made scaffold batten supports. A "break" or cutting iron fixed to the scaffolding batten, with slate knife to hand for any last minute adjustments to slate width and angle cutting.

View towards roof apex - note the slate nailing has now changed to single nailing as the slate width diminishes. Timber packers under scaffold batten supports protect slate work. It would be difficult to replace a damaged slate, so care has to be taken when climbing up the various scaffold lifts.


View of the overall building showing the various scaffold batten lifts.

Note the slate with a slightly green tinge - this one escaped attention during the grading process, but the odd chipped corner and feather cut edges all add to the overall character.
[edit] Slate selection and grading.
The size or width of slate available for the eaves course is checked and it is best to use as wide a slate as possible as the slate widths will diminish in size towards the apex. It is also important to ensure the largest size slate chosen will lie properly on the roof around the eaves course. The smaller the roof diameter the smaller the slate width required.
Once the size of slate for the eaves or starter course has been decided the number of slates required to go round the circumference is calculated. This may not work out to an exact number of slates or slate widths, therefore choosing the next round number up, the circumference is then divided by the total number of slates. This is important to ensure each slate on each course all the way from eaves to apex, are the same width at the bottom of the slate on each individual course. For example, all the slates on the eaves course should have the same base dimension, just as the slates on any other course going up the roof will all have the same base dimension for that course.
Before any work is carried out on slate marking or cutting, an approximate calculation of the total number of slates for the entire roof is required. There are several reasons for this – If the finished roof is required to have a graded appearance ie with thicker slates at the eaves gradually getting thinner towards the apex, all the slates have to be graded into say ‘thicks’, ‘middles’ and ‘thins’ – there may also be other thicknesses in between. By looking at the thickness of the slate and feeling the weight, the grading process becomes easier. Add to this, the size selection as wider slates will be used on the first few courses and then to save cutting or wasting slates, narrower sized slates can be used higher up the roof.
Grading and sizing the slates is a time consuming job and requires space to set out the various racks of slates to keep these in a manageable order. If care is not taken in this preparation work, the actual working with the slate either in marking and cutting or in putting the slates on the roof, will become very difficult.
[edit] Template – for marking and cutting\dressing.
Once the slates are selected and graded, a template is required in order to allow the marking and then the cutting or dressing of each slate. In the example roof there were over 4000 slates and each one required two cuts to form a tapered shape – see image.

Note : Not all slates should be cut or dressed at once. Mark and cut eaves course initially and fix these on the roof – this allows for any slight tweaking of the template or cutting technique.
For example, if there are 100 slates to each course, and if the marking and cutting is just 0.5mm out an error can creep in very easily - 100 x 0.5mm = 50mm. Take care to understand the setting out and cutting as you go. Take time and do not get ahead of yourself.
Using a long piece of wood, plywood or two pieces of sarking board fixed together, make a working template. This template will form a shape which will be one part of the overall sloping \ curved roof – imagine an apple pie cut into numerous slices, each one the same size – it is similar to the conical roof, each slice (or the template) added together will make up the entire roof.

The template dimension at its widest end will be the size calculated earlier by dividing the circumference of the roof (at eaves level + the drip or overhang) by the number of slates. The other end of the template will be a point. The length of the template will be the same as the length from eaves to apex on the actual slope of the roof (plus overhang).
Next the slate cover and gauge must be calculated – this does depend on the geographic location of the building on which the roof will be placed and also the roof pitch and type of slate. It is important to have these dimensions calculated and set out properly.
[edit] Slate marking and cutting\dressing.
Each course is then marked onto the template. It is suggested that the template is supported on a bench or similar at around thigh height. Place one slate at a time on the template, face up and with the bottom of the slate aligned with the template course line and slate held centrally, mark or score the underside of the slate with a nail or pointed marker. As it may be necessary to mark and cut 4000 + slates, it is worth taking time to set the template properly and to consider making a simple marking tool as holding on to a nail for 8000 score lines can be painful.
Using the template, mark out a few of the eaves course – say 6 slates. Cut these first and try them on the roof to see how they sit next each other – check the angle by fixing a piece of thin gauge wire to the apex of the roof on a nail or bolt with a washer allowing the wire to be taken down to the eaves and all the way round the roof. The wire will allow the angle of cut to be checked – it should be close if the geometry calculations were done correctly and the roof structure is true.
Make any slight adjustments and continue marking, cutting and fixing the entire eaves course.
In order to help ensure each subsequent course of slates sit tight with those previously fixed, it may be necessary to cut the shoulder off the slates. See image below showing slate shoulder marking and cut slates stacked ready for fixing.

 Note each slate course is numbered - this one SR C1 (Small Roof, Course 1)
[edit] Cutting slates
Depending on the slate thickness and how skilled the cutter is with a slate knife, the lower courses may be difficult to cut and keeping to a straight line can be problematic. A heavier mash hammer can be used for these thicker slates, reverting to a slate knife as the slates become thinner – see video on you tube.
Next mark and cut/dress the next course and fix these to the roof, all the time checking the angle and ensuring the course is fixed true by checking with a wire - add a piece of insulating tape or similar to the wire to indicate the bottom of the slate in each course. Also use the wire to mark the position of the next row of slates. This makes nailing the slates onto the roof quicker if you have an entire course marked out in advance.
Valley slating - as the two roofs merge, the valley is naturally curved which adds a nice feature to the roof.

[edit] Nailing slates.
The first few courses can be double nailed just as with any other roof, but as the slates get narrower toward the apex of the roof the slates need to be top nailed in order to provide cover. The slates will also sit neater and tighter, if the top shoulders are cut off and the slates have been properly graded (thicks, middles, thins).
Cover to nails or nail holes is important to ensure the roof is held watertight. On this image below the two nail holes were too low down the narrow slates to provide sufficient cover. These slates were stripped and new ones cut, with a single nail hole centre top.

Image below showing centre top nailing technique to provide cover to nail holes.
Note the cross marking mid slate which is carried out using a thin gauge wire attached at the roof apex stud and taken down to mark every slate course and corner points of next course of slates. This ensures every course is fitted at same height and side cuts line up to roof apex.

Image below showing view from eaves to apex.


The above image shows the thin gauge wire and tape used to mark course heights. The wire is also used to mark the bottom corners of the next course of slates and for checking the angle of cut so that each slate side points towards the apex.
That is the basics and although it is extremely hard work and a very slow overall process the finished roof should be a work of art.
This article was runner-up our 2013 CIOB-backed article competition. It was created by --Roundhouse Architecture. 11 March 2013. They are happy to receive questions about this subject.
[edit] Related articles on Designing Buildings Wiki
IHBC NewsBlog
IHBC sponsors Gardens Trust event 23-4 Sept 2026
.jpeg)
'Learning from the Past, Shaping the Future’ takes place in Milton Keynes
Renovations to Frank Lloyd Wright's Fallingwater complete
.jpg)
World Heritage Preserved project opens house for tours again
Shakespeare Birthplace Trust places Hall's Croft on HAR Register
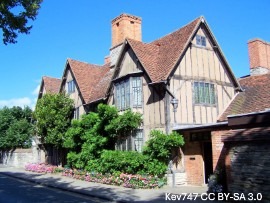
Stratford-upon-Avon home of Shakespeare's daughter is 'At Risk'
Lady Grange’s House repaired on St Kilda
.jpg)
National Trust for Scotland repairs stone cleit with link to famous island resident
Griff Rhys Jones on BBC Radio 4 Today programme
,_Green_Lane,_Derby.jpg)
The Victorian Society’s President unveiled its latest Top Ten Endangered Buildings 2026.
Need a MATE? Book your place now.

IHBC offers free webinars on applying for IHBC accreditation (Full & Associate).
UK Stained Glass Repository finds windows new homes

How are stained glass windows are rescued, stored and repurposed?
APPGEBE report sets high aims for quality
'Government must not sacrifice quality in drive to build 1.5m homes'
New measures protect Historic Shipwrecks from heritage crime

Underwater cultural heritage benefits from new HE guidance
How could the City of London skyline look in 6 years' time?

Visualisation shows approved planning applications as completed buildings
National Trust for Scotland calls for VAT cuts
Heritage neglect is encouraged by current policies
IHBC's 'Context' Issue 186 features Industrial Heritage

IHBC's members' journal reports on the challenges of conserving infrastructure
Book now for IHBC Annual School 2026

IHBC Annual School is taking place 18-20 June 2026 in Newcastle
RICHeS Research Infrastructure offers ‘Full Access Fund Call’

RICHeS offers a ‘Help’ webinar on 11 March
Latest IHBC Issue of Context features Roofing
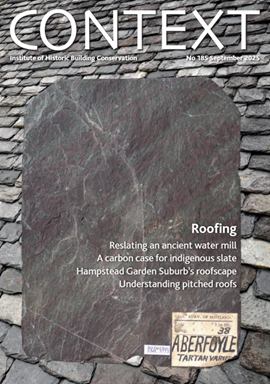
Articles range from slate to pitched roofs, and carbon impact to solar generation to roofscapes
Three reasons not to demolish Edinburgh’s Argyle House

Should 'Edinburgh's ugliest building' be saved?
IHBC’s 2025 Parliamentary Briefing...from Crafts in Crisis to Rubbish Retrofit

IHBC launches research-led ‘5 Commitments to Help Heritage Skills in Conservation’
How RDSAP 10.2 impacts EPC assessments in traditional buildings

Energy performance certificates (EPCs) tell us how energy efficient our buildings are, but the way these certificates are generated has changed.
Comments
Interesting overview of conical roof slating. The detail about careful setting out and consistent slate sizing really shows how much skill goes into getting a curved roof to look clean and balanced. It’s similar to exterior maintenance work from teams like Nicks Window Cleaning Services, where the small details make a big difference in the finished look.